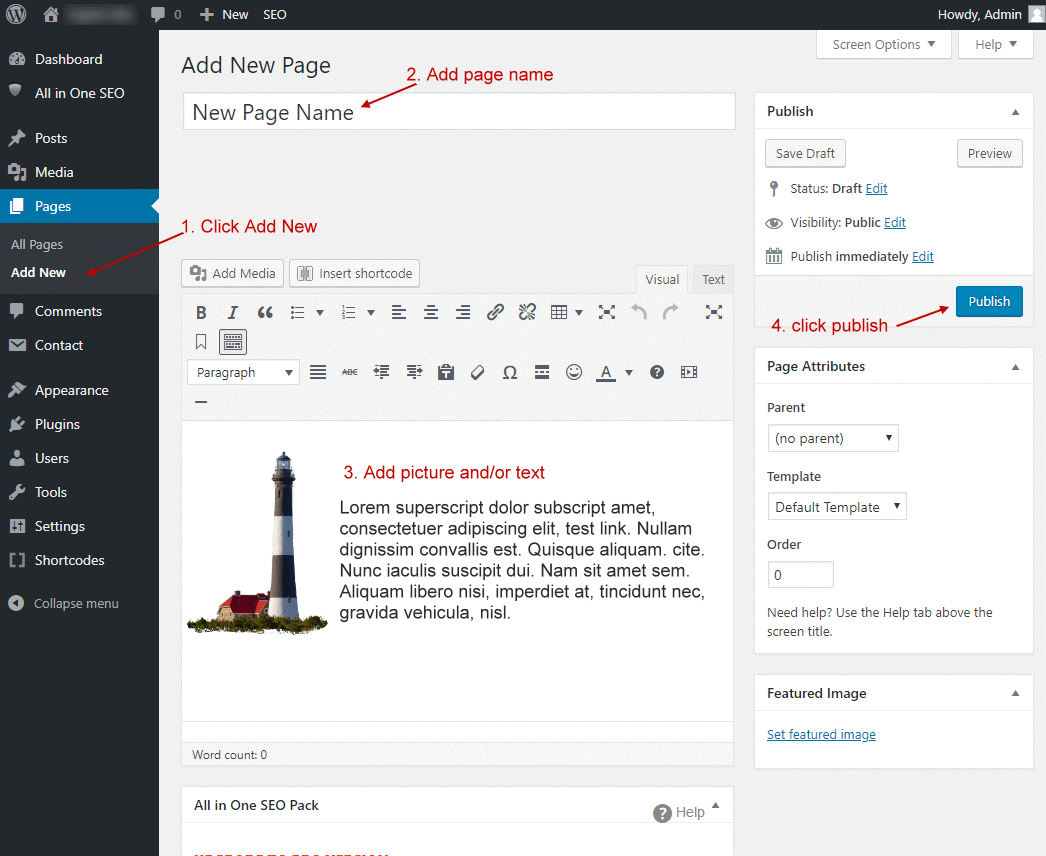
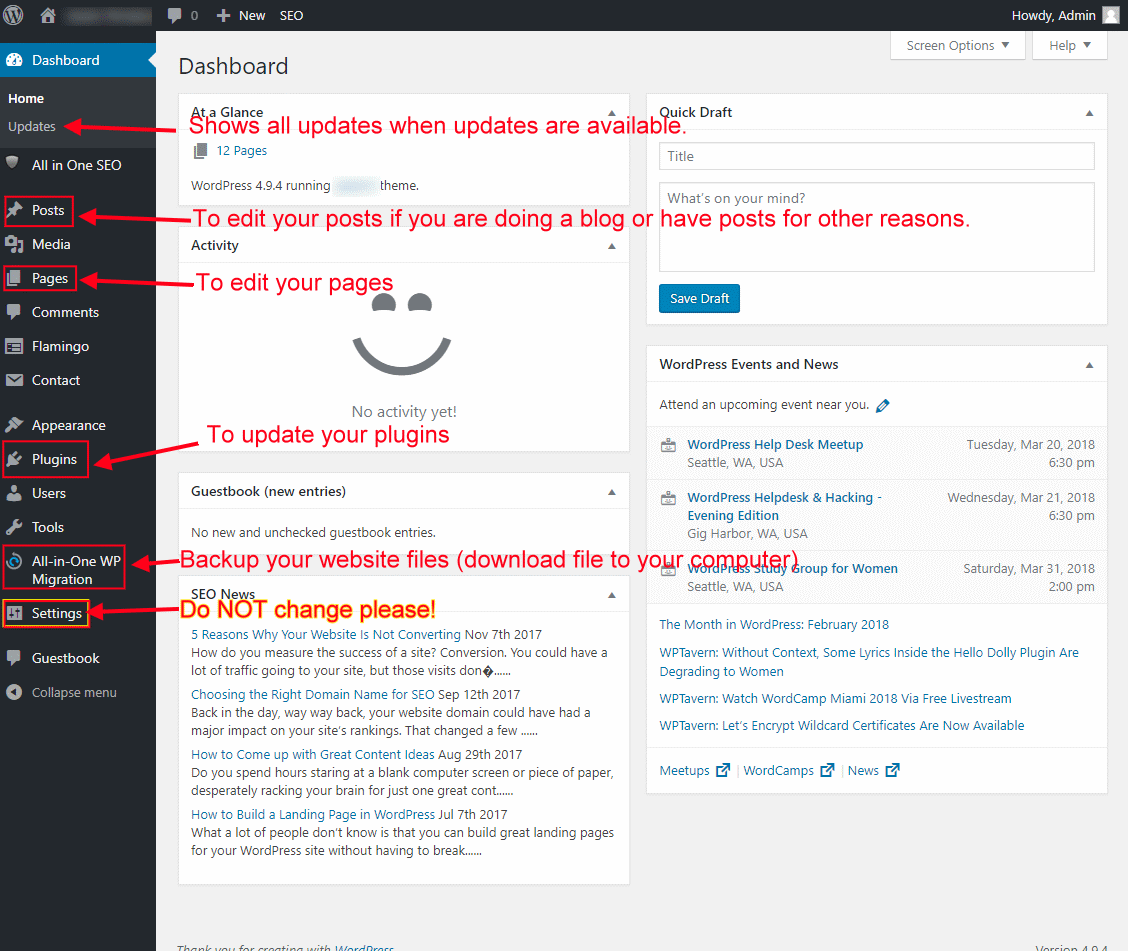
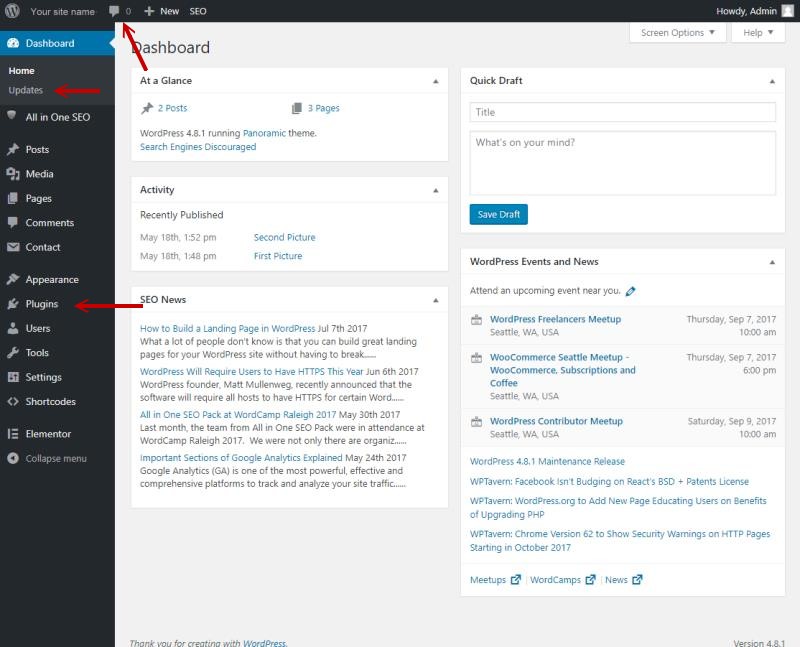
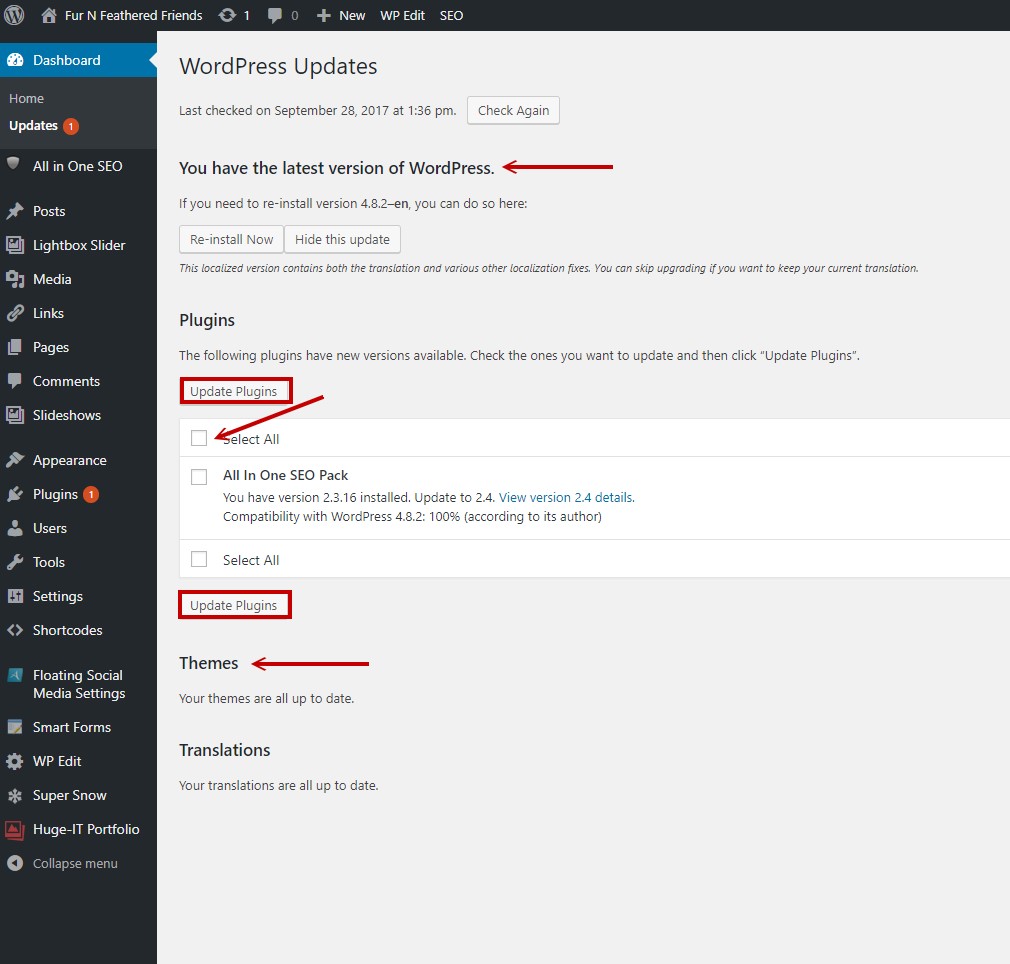
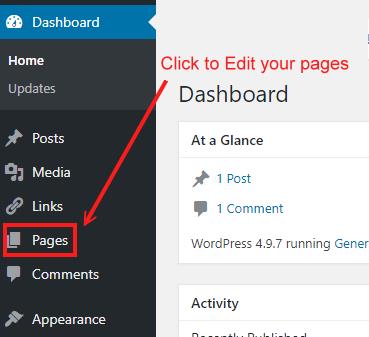
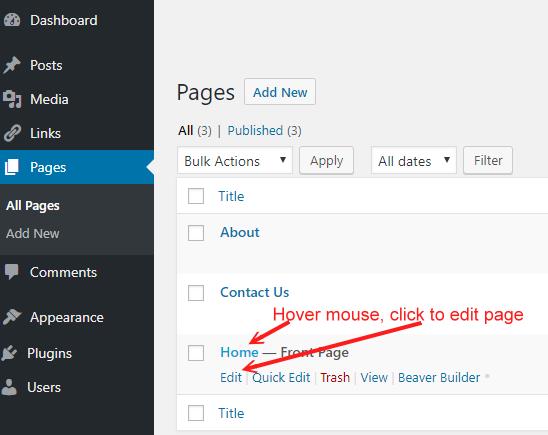
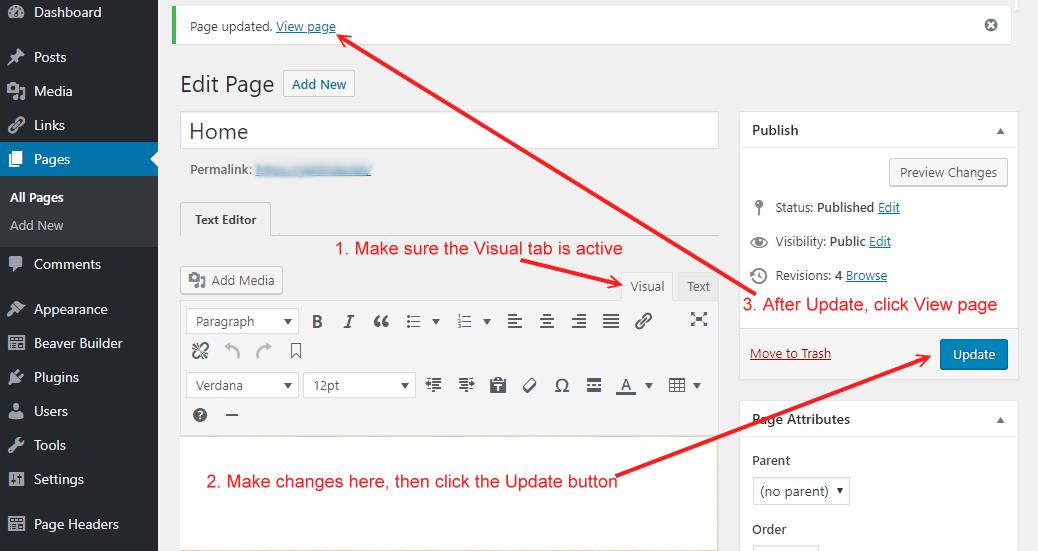
WordPress Help

Off site links to WordPress.org help files will open in a new window, close to come back here.

Extra Tips & Tricks for editing your WordPress website setup/designed by Gerlinda.com.

Your  Wordpress admin is called the Dashboard.


Table of Contents

Settings Tab:

The Settings tab; all has been set, you don’t need to change anything. You only need to work with your Pages and (Posts if you are doing posts.) Don’t worry about any of the other tabs for now.

Your wordpress version should automatically update, you will need to update your plugins but only if/when they say updates are available. Depending on your host some are updated automatically. Just go to the plugins page or Update area and click update for the ones that need updating, that’s it.  If you need help, let me know!

Updating Your Plugins:

Plugins; your page may look slightly different depending on the plugins used for your website. You do NOT need to purchase the pro versions of any of the plugins. The ones you have will generally be enough.

  • There are 3 places that you will get a notice that you have Plug ins that need updated. (Red Arrows Fig 1 Update Plugins)
    • 2 of those will also let you know when WP needs/has updated and if any Themes in the WP Library need updated.
  • The Top 2 will take you to the same area and list out everything that needs updated.
    • Check mark the Select All
    • Click on Update PlugIn (or Themes, etc. Fig. 2)
      • There are 2 boxes (red rectangles) choose either one.
    • Plugin page itself, click update for the ones that say update available. (Fig 3)

If you need help updating plugins, or are confused about anything,  just let me know, I will help you.

Editing with WordPress; Classic Editor

To Edit Pages

WP Visual Editor (Classic Editor)

or if you are using the Elementor Page Builder go to the Elementor help page.

***Please click the help links below, they have more in depth step by step explanations and “how to” instructions that will help you with editing your website. This will make things much easier and you can come back often as you have questions.

This is an animated view taken from the visual editor manual at WordPress for a quick look at the editor.  (click to view) In some circumstances your editor may have a few more options. Please see the visual editor link below for a more in depth view of options and how to’s.

animated overview of the editor

For editing your pages, explaining the editor icons and adding and formatting text, etc.
http://make.wordpress.org/support/user-manual/content/editors/visual-editor/

Linking Images & Text

For linking images and text, also for linking to any of your existing pages, check out the icon that is for linking. It is number 10 in their help photo on the first row of the editor.

You highlight your text or click a photo that you want to link, then you click the link icon, put in the website address or start typing a page name you want to link to, and options will appear.

For adding photos, videos, music to pages and shows what all is available on editing the images.
https://codex.wordpress.org/Inserting_Media_into_Posts_and_Pages

Extra Tips below for Adding Images, Galleries, Editing your Menu & SEO Tips
To place images in the middle of your page, click the center text icon.
To add images use the Add media button above your editor. Go to edit the page you want to have those photos appear in, then upload them so they are attached to the correct page.

When adding a photo to a page after uploading click the photo so there is a check mark in it. On the right of the picture, on the right of your screen is where you can add the Title, caption and description for the picture. This is also where you choose which size to use. Wordpress automatically makes 3 versions of your photo, you have thumbnail, medium, large and actual size. Please do not choose actual size if it is larger than your large version.
See more detail and preview image here!

Adding a Border for a Single Photo

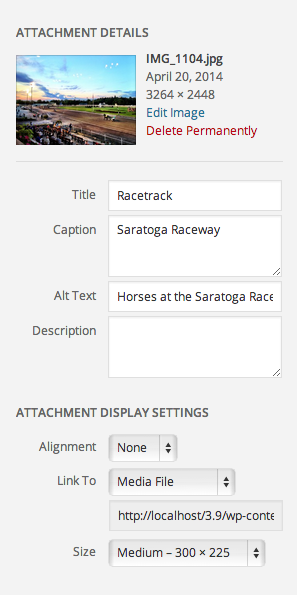
IMPORTANT! For special SINGLE photos you may not want the white caption border and captions to show,  be sure you do NOT add a caption or description for these single photos, also be sure your photo doesn’t have an automatic caption from your camera or you will see the white caption border with the camera’s captions, usually just the brand name of your camera. 

INSTEAD DO THIS FOR SINGLE PHOTOS, it looks much better than the auto caption borders!
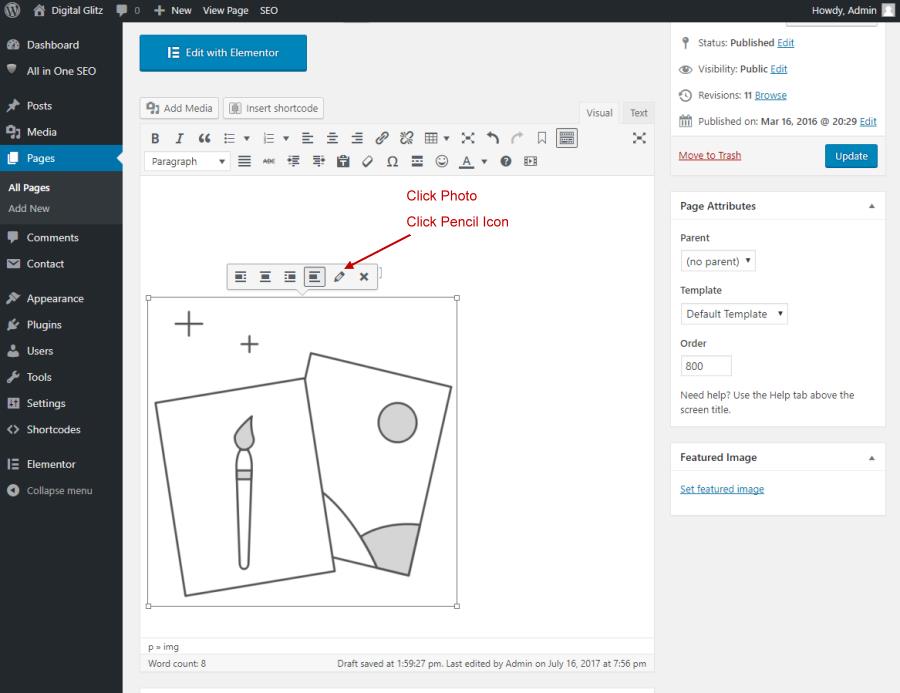
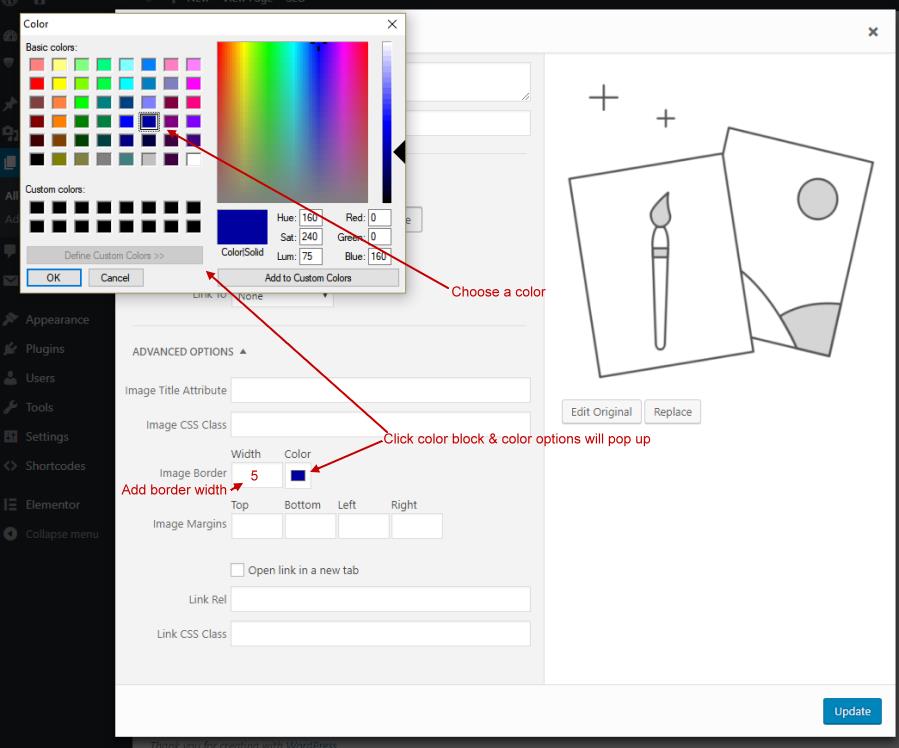
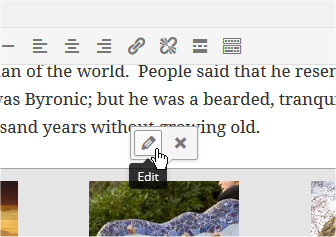
For adding a simple border for SINGLE photos (
not for Galleries, this is an image border plugin for single photos added to a page), you add the photo to your page first, then you click the photo, click the pencil icon on the photo, (fig.1)and now down under advanced image options, click down arrow if not open (see fig.2), you will see image border, put in how wide you want your border, then click the color tab, it is black by default, choose a color, (fig.3) click ok, then click update, it will take you back to your page and you should now see the border. Visual of options below.


Viewing All Images Added to a Page

View all the images and add pictures to the page that you are working on in the editor, (fig4) click on the Add Media link, then from the drop down where it says All Media Items, choose Uploaded to this page, that way you can see the photos that are just on the page you are editing. This makes it easier to delete any pictures you are no longer using, you don’t want to keep more on there than you need. To delete photos on the page, just click the X, and they will be deleted off the page, but not out of your media file.

Deleting Photos from the Media Library

To Delete Photos from your main Media Library
Click Media on the left in your dashboard menu to open your library of photos.
Be sure you are in list view – check mark all the photos you want to delete – choose Delete Permanently from the Bulk Actions, then click Apply. A pop up should appear telling you can’t undo. See image with steps on how to. Be sure you are not using the images you are deleting on any of your pages or you will have broken picture areas on the page that is referencing the image.

Edit an Existing Photo Gallery

To edit your existing photo gallery just go to edit the page that the gallery is on, Click the gallery photos, then click the Edit Pencil Icon (Fig. 5) that appears, edit, add/delete images in your gallery, then click update gallery.

https://codex.wordpress.org/The_WordPress_Gallery

Add a New Image Gallery

To Add a New Gallery
Go to your page that you want to add a gallery. Click where you want your gallery to show, then Click Add Media, upload your pictures that you want to include in the gallery, (fig.6) then click create gallery, now choose on the right side “Link to Media File” this will allow your photos to open in the light box. Choose how many thumbnails, 3 is standard in a row. Click Insert Gallery.

Adding Posts & Pages

Adding a Post – In your Dashboard click on Posts
1. Add New is at the top on the left, click
2. Give it a subject/title
Add text and/or images
3. Be sure you choose the category you want your post to be under
On the right side click Blue Button ‘Publish’

Adding a Page
In your Dashboard click on Pages
1. Click on Add New page
2. Give it a Name
3. Add text and/or images
4. Click Publish
(Don’t forget to add your SEO – Click here to see)

Editing Your Menu

Editing your menu, adding to the menu, putting the pages in the order that you want, & how to add the subpages. You can add more pages and  you can add subpages underneath any of the pages there. See below.

https://codex.wordpress.org/WordPress_Menu_User_Guide

To place the page onto your menu and put the page links in the order you want them to appear, you go to your dashboard then under Appearance > Menu – (menu will be setup for you already & usually named Menu 1) (fig.7) find the new page name you just added on the left column, check mark it, then click add to menu, then to place where you want it, drag the pages into the order you want.

For main pages, be sure they are all lined up, for subpages (called child pages in the example) (Fig.8) be sure they are underneath the TAB/Parent Page you want them to be and that they are indented, just pull them sideways a little. Keep your page names short so they fit on the button. The page names can be shortened right in your menu area, (it will not change on your page) just open the dropdown for the page in the tab and shorten the name under navigation label. See Fig 8A.

Adding Tabs to Your Menu

Fig. 9

To add Tabs for child/subpages, click on Custom Links on the left hand side underneath pages & posts
Where it had URL  http:// – backspace http:// and put in a # hash tag.
(Fig.9) Then in the Link Text area type in the tab name, then click add to menu. Keep it short to fit in your menu buttons.

Drag it where you want it to be then add the pages you want under that tab, be sure those pages are indented like shown in Fig. 8.

The SEO Edit Area

SEO Details

The SEO edit area for your pages is found on each page under the editor, just scroll down, be sure to click the update button after you work on your pages, and/or edit your SEO section. This lets you add browser title tag that appears in your browser for the search engines, meta description and meta keywords. I have already added these for you, but feel free to change. Please pay attention to the character count, if it goes into the red, you are past maximum allowed.

If you need help with anything, contact me!

How to Create a Back Up

How to Create a Back Up of your Website

When Gerlinda.com creates and builds your website for you, we install a plug-in named All-in-One WP Migration by ServMask.

As a one (1) time courtesy, at the time of completion of your website, we create a back up for you to keep on file in our records.

We highly recommend that you create a back up at least once (1) a month, if not more often, depending on how often you update your website.

This plug-in does create a back up on your Hosting Server as well as the one depicted in the instructions below.

Depending on your Hosting Account/Company, some may have the Managed WordPress. This Hosting Option normally includes daily back ups.

However, be aware that should something go wrong with your account for any reason, they may not have access to either back up.